In this walkthough, we will try injecting faults into an AES accelerator, retreive the secret key and protect the accelerator against the attack. The target AES accelerator that we are going to use can be found here. This repository is already linked to LABS inside work/aes. You may try running the accelerator using an open-source Verilog simulator, Icarus Verilog (iverilog), or any other simulators. LABS links iverilog which can be found in the iverilog directory. This requires an installation which you can follow here.
To run the accelerator, you can run the command below.
cd work/aes
iverlog src/rtl/* src/tb/tb_aes_core.v -o sim
./sim
We can see that the accelerator is run, and the outputs are correct. You may try familiarizing yourself with the design by taking a look at the code.
Before using LABS, a Verilog or Chisel3 design is required to be converted to FIRRTL as LABS is integrated into the FIRRTL hardware compiler framework.
cd work/aes/src
mkdir firrtl
cd ../../..
 ./labs -a yosys -i work/aes/src/rtl/\* -c yosys_script.tcl -d work/aes/src/firrtl
After running the last command, TestDesign.lo.fir which contains the entire AES accelerator design in FIRRTL is generated inside work/aes/src/firrtl. This is equivalent to the design in Verilog.
In this walkthrough, the AES attack by Giraud et al. is used. The idea of this attack is to try to inject a single-bit fault to the intermediate data at the beginning of the last round of AES. By getting enough number of faulty ciphertexts (by rerunning the accelerator and injecting different fault values) with the correct ciphertext, we can reveal the secret key using their algorithm.
By taking a look at this AES accelerator, we can inject a single-bit fault directly to the state register inside the encipher module (aes_encipher_block). It consists of 4 registers to store the entire state of AES named block_w{0, 1, 2, 3}_reg, and these are updated using the block_new logic.
Now, let’s integrate synthesizable fault injection components into the design to attack the accelerator. We can tell LABS to do what we want by feeding a configuration file. In this walkthrough, let’s create a configuration file named configuration.anno.json with the texts below. If you are not familiar with LABS commands, you may read the how to use page first.
[
  {
    "class":"labs.passes.ClockAnnotation",
    "target":"None.None.clk"
  },
  {
    "class":"labs.passes.ResetAnnotation",
    "target":"None.None.reset_n",
    "posedge_reset": 0
  },
  {
    "class":"chiffre.passes.FaultInjectionAnnotation",
    "target":"aes.aes_encipher_block.block_new",
    "id":"main",
    "injector":"chiffre.inject.ConditionInjectorCaller"
  },
  {
    "class":"chiffre.passes.ScanChainAnnotation",
    "target":"aes.FaultController.scan",
    "ctrl":"master",
    "dir":"scan",
    "id":"main"
  },
  {
    "class":"labs.passes.FaultControllerUDAnnotation",
    "target":["aes.aes_encipher_block.round_ctr_reg", "aes.aes_encipher_block.round_ctr_we"],
    "data_target":["h_9", "h_1"],
    "affected_bits": [[0], [1], [2], [3], [4], [5], [6], [7], [8], [9], [10],
    [11], [12], [13], [14], [15], [16], [17], [18], [19], [20], [21], [22],
    [23], [24], [25], [26], [27], [28], [29], [30], [31], [32], [33], [34],
    [35], [36], [37], [38], [39], [40], [41], [42], [43], [44], [45], [46],
    [47], [48], [49], [50], [51], [52], [53], [54], [55], [56], [57], [58],
    [59], [60], [61], [62], [63], [64], [65], [66], [67], [68], [69], [70],
    [71], [72], [73], [74], [75], [76], [77], [78], [79], [80], [81], [82],
    [83], [84], [85], [86], [87], [88], [89], [90], [91], [92], [93], [94],
    [95], [96], [97], [98], [99], [100], [101], [102], [103], [104], [105],
    [106], [107], [108], [109], [110], [111], [112], [113], [114], [115],
    [116], [117], [118], [119], [120], [121], [122], [123], [124], [125],
    [126], [127]],
    "durations": [1, 1, 1, 1, 1, 1, 1, 1, 1, 1, 1, 1, 1, 1, 1, 1, 1, 1, 1, 1, 1,
    1, 1, 1, 1, 1, 1, 1, 1, 1, 1, 1, 1, 1, 1, 1, 1, 1, 1, 1, 1, 1, 1, 1, 1, 1,
    1, 1, 1, 1, 1, 1, 1, 1, 1, 1, 1, 1, 1, 1, 1, 1, 1, 1, 1, 1, 1, 1, 1, 1, 1,
    1, 1, 1, 1, 1, 1, 1, 1, 1, 1, 1, 1, 1, 1, 1, 1, 1, 1, 1, 1, 1, 1, 1, 1, 1,
    1, 1, 1, 1, 1, 1, 1, 1, 1, 1, 1, 1, 1, 1, 1, 1, 1, 1, 1, 1, 1, 1, 1, 1, 1,
    1, 1, 1, 1, 1, 1, 1]
  },
  {
    "class":"labs.passes.FaultTolerantTMRAnnotation",
    "target":"aes.aes_encipher_block.None",
    "feedback_target":["new_block"],
    "feedback":2
  }
]
The FaultinjectionAnnotation indicates the target component to be attacked, which is the block_new logic, using ConditionInjector, that injects bit-flip faults. We can also see a big chunk of a FaultControllerUDAnnotation JSON, which indicates the signals to be observed, user-defined fault values to be injected and fault durations. Each pair of “target” and “data_target” fields indicate the observed signals and target data values. Only when all of the signals are equal to their associated data targets, the fault controller sends a firing signal to the fault injectors to inject a specified fault. In this walkthrough, we want to inject faults at the start of the last round of AES, which is round 10. Thus, we inject faults when the accelerator is at the transition from round 9 to round 10. The “affected_bits” shows the indices of the block_new signal to be flipped which, in this case, shows that we want to inject a single-bit fault to each index sequentially.
We can feed this configuration to LABS to integrate fault injection components using the commands below.
cd work/aes/src
mkdir rtl_faulty
cd ../../..
./labs -a inject -i work/aes/src/firrtl/TestDesign.lo.fir -c work/configuration.anno.json -d work/aes/src/rtl_faulty
After this, the aes.v file is generated inside work/aes/src/rtl_faulty. Note that this aes.v contains a fault controller and fault injector that store the configuration.
Now, we are ready to inject faults to the design and collect faulty ciphertexts. Let’s run simulation to get it.
cd work/aes
iverilog src/rtl_faulty/aes.v ../tb_aes_core.v -o sim
./sim
Note that this tb_aes_core.v is a modified one. As the original tb_aes_core.v is used to run different testcases, the modified version instead runs one testcase 128 times to inject 128 single-bit fault for our attack and removes some print comannds. It also generates result.txt that contains the outputs of all the runs. We can see that the outputs are incorrect, each having one faulty byte.
We can run the attack algorthm using the command below.
cd fault_analysis
python3 giraud.py ../work/aes/result.txt
The output graph is shown which should look like this.
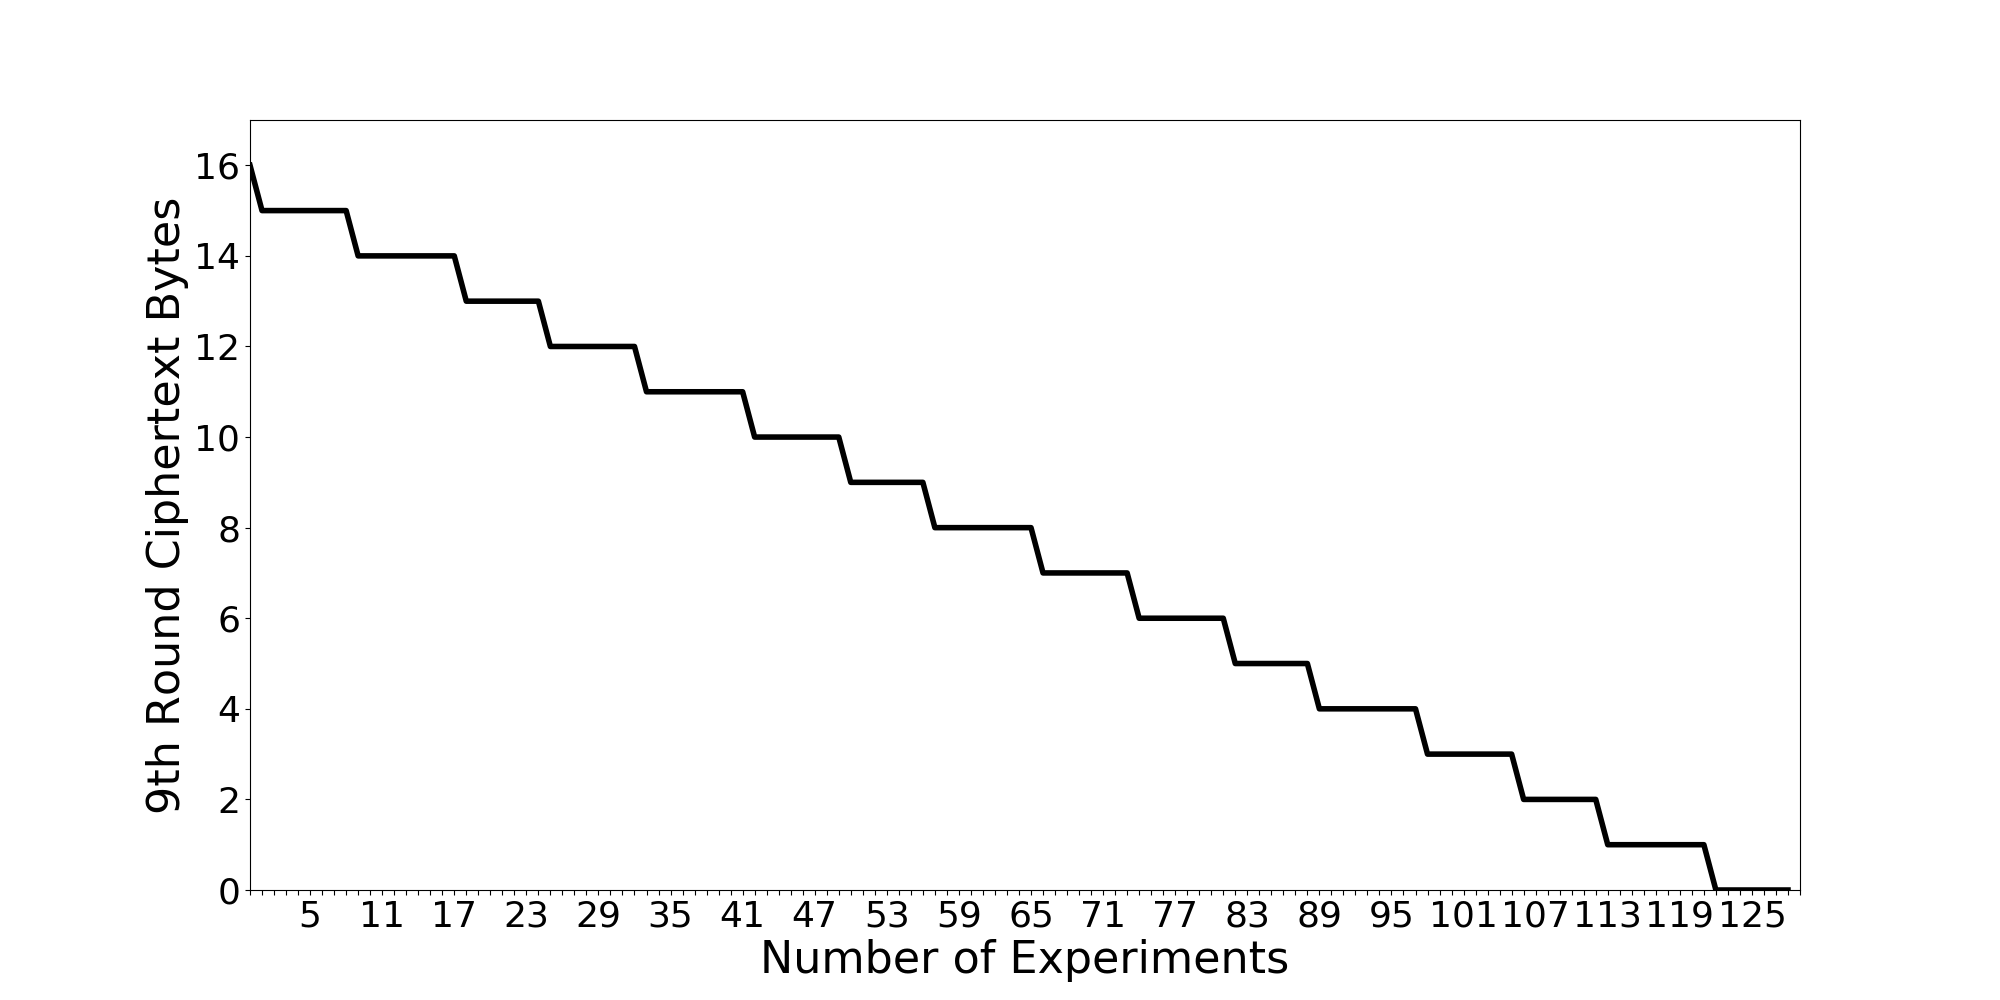
This graph shows the number of bytes of the 9th round ciphertext needed to be revealed. We can see that after 128 runs we can reveal the entire 9th round ciphertext. Even though this is not the secret key, we know how the AES algorithm works and can reveal the secret key easily.
This shows that the AES accelerator is vulnerable to this attack. LABS also supports automatic hardware redundancy integration. Let’s protect the entire AES encipher block using this feature.
We can see the last JSON in the configuration file. The FaultTolerantTMRAnnotation is used. The target indicates the location that the protection is integrated into which, in this case, is the entire AES encipher block. None at the last part means we want to integrate TMR to the entire aes_encipher_block. This can be changed to a component inside aes_encipher_block to integrate TMR to the component inside.
To let LABS integrate a protection based on the configuration, run the commands below.
cd work/aes/src
mkdir firrtl_protect
cd ../../..
./labs -a protect -i work/aes/src/firrtl/TestDesign.lo.fir -c work/configuration.anno.json -d work/aes/src/firrtl_protect -x low
Note -x low behind. This tells LABS to output the protected design in FIRRTL instead of Verilog because we are going to integrate the same fault injection components again to test whether the protection works or not. We can use the same commands to integrate fault injection components.
cd work/aes/src
mkdir verilog_protect_test
cd ../../..
./labs -a protect -i work/aes/src/firrtl/aes.lo.fir -c work/configuration.anno.json -d work/aes/src/rtl_protect_test
Using iverilog to run simulation again, we can get a new graph.
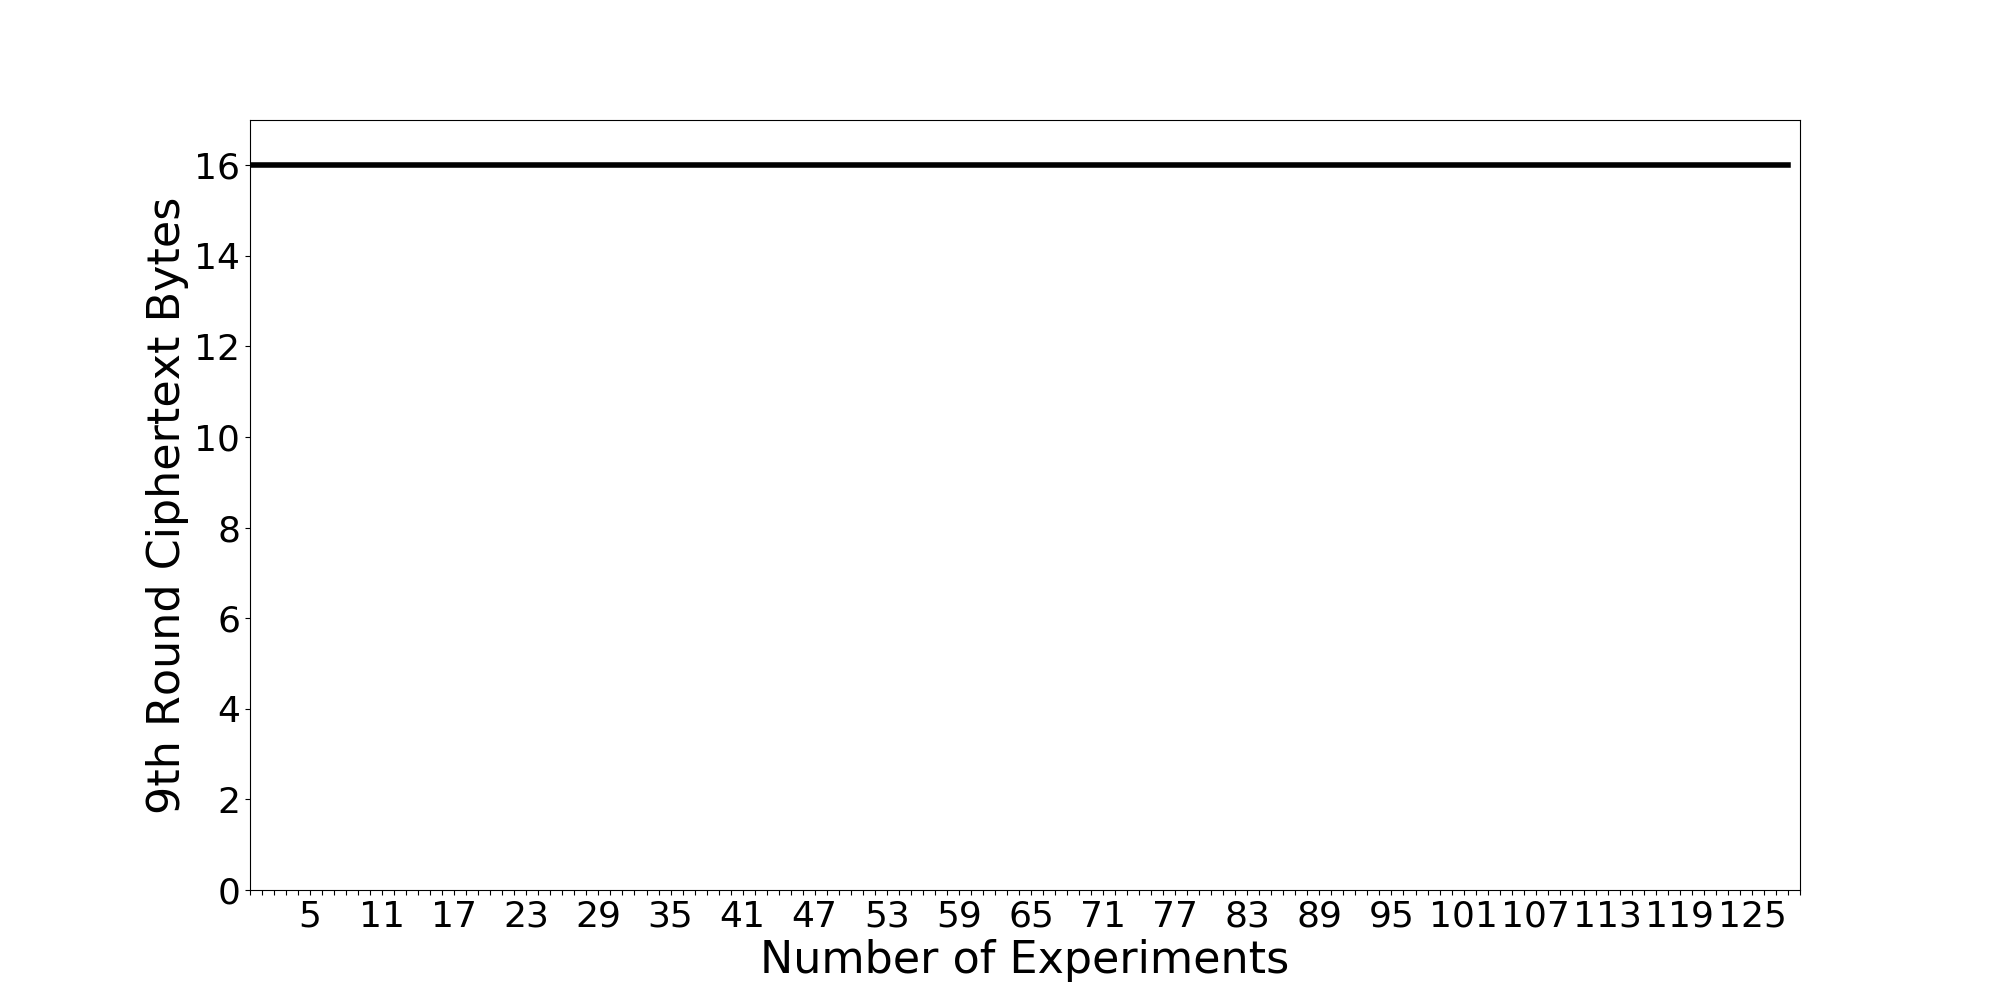
Great! Now, the design does not leak any information from the attack!